An alternative approach to SSHFS on Windows
16 Oct 2017File sharing on Windows typically leverages the SMB protocol. While this is reliable, there are cases where SSHFS is preferable, most notably when interacting with *nix servers that have SSH access but don’t have SAMBA.
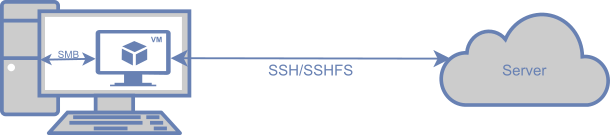
While there are options for running SSHFS natively on Windows, I’ve often found it unreliable; instead I’ll use a Linux VM as an intermediary to establish the SSHFS mount, and expose it to Windows as a SMB file share.
Preface
Note that the use cases for this method is limited. It’s almost always better to try out a different solution. For example, if the server supports SMB file sharing and SSH access, but SMB file sharing is firewalled, it is possible to use SSH port forwarding (and a loopback adapter) to overcome that. See here for more info.
Native SSHFS on Windows
Direct SSHFS mounting under Windows is possible through Dokany (user-mode filesystem driver) and Dokan SSHFS. I’ve personally found this to be unreliable. Granted, I used this before the Dokany fork, so the situation may have improved since. WSL may also support this, some time in the future.
Prerequisites
For this method, you’ll need a virtual machine running Linux with SAMBA installed. I’ll be using VirtualBox with Ubuntu 16.04 as my base. I’ve also configured a host-only adapter that allows access to the VM’s SMB file shares from the host machine:
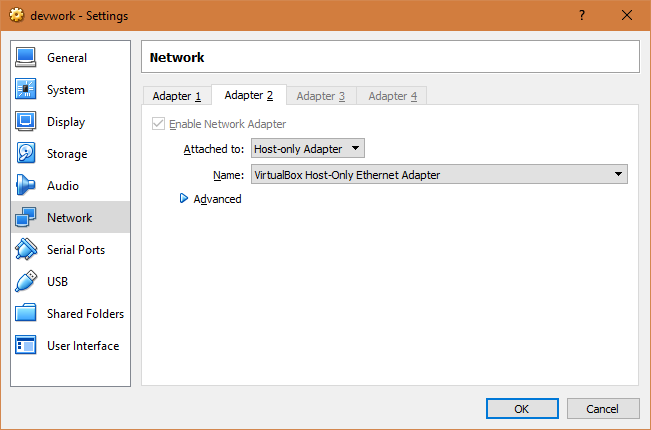
In my case, the adapter appeared in the guest as enp0s8. From ifconfig, the address was 192.168.56.102 (typically it’s 192.168.56.101 if you only have one VM); if SAMBA has been set up correctly, then it should be accessible from Windows via e.g. \\192.168.56.102.
Here’s a sample SAMBA config (a section under /etc/smb.conf):
1
2
3
4
5
6
7
8
9
10
11
[osx]
   comment = OSX shiterra
   path = /osx
   browseable = yes
   writeable = yes
   guest ok = yes
   acl allow execute always = True
   read only = no
   public = yes
   # IMPORTANT: Replace 'user' with the VM's username
   force user = user
This allows anyone (without password) to access, modify and run executables off that share (as e.g. \\192.168.56.102\osx). This is fine for me, as it’s only accessible locally on the host machine. Most important is the force user option, which should be set to the username of the account used under the VM.
Make sure to restart SAMBA after any changes:
1
sudo systemctl restart smbd nmbd
Check first that you can access this share and read/write files to it, before mounting any SSHFS shares on that location.
Setting up FUSE/SSHFS
First, ensure that sshfs is installed:
1
sudo apt-get install sshfs
Then modify /etc/fuse.conf, adding:
1
user_allow_other
After that, you should be able to use SSHFS as:
1
sshfs -o allow_other,idmap=user remote-user@my-host:/my/path/to/mount /osx
sudo may/may not be required, depending on the destination mount. The idmap option ensures that operations performed under the local username user is mapped to the remote username remote-user. This is important for SAMBA to function correctly, especially in order to get write access from the SMB mount. This option may not be needed if mounting the remote share under the same user.
Comments