Using a Raspberry Pi as a Print Server for the HL-2140
27 Dec 2016One of the things you begin to truly appreciate is the convenience of a networked printer. When our last one stopped working due to a drum failure, we were left with a single, USB-only Brother HL-2140 laser printer. And while it certainly worked, being able to print only from one computer was a real pain in the ass!
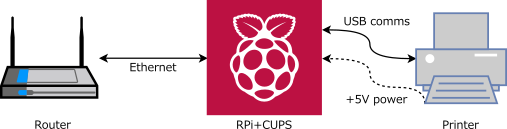
With a spare Raspberry Pi lying around yet again, it was time to fix that. The end result was a fast, AirPlay compatible, on-demand print server, with Windows clients connecting using LPR and *nix clients via IPP.
Contents
- Preface
- Setting up the Raspberry Pi
- Testing the setup
- Further customisations to the RPi
- Modifications to the printer
- Final notes
Preface
I’ll start off by saying that nowadays, printers are so cheap that they’re essentially throw-away items. Networking capability is also more or less a given, with the price point as low as $65-$70. When put into perspective, that’s only slightly more than the cost of a Raspberry Pi! Granted, this project was more about making the most of equipment already at hand.
Requirements
My use case is for a home environment, where more often than not, the printer is off. This is unlike in an office, where the printer is almost always online. As a result, my requirements were:
- The RPi should be on only when the printer is on
- It should boot as fast as possible - to be ready when the printer has started
- It should handle frequent hard power interruptions gracefully (i.e. when the printer gets turned off)
- The fewest possible modifications to the printer should be made
- On the client side, it should handle the printer being offline gracefully. This means allowing printing while it’s offline, where it will print when it finally comes online
This is fairly specific, but they were nuances that I noticed and liked about the old printer. Importantly, none of the countless online tutorials cover these issues:
- Many suggest to use CUPS and IPP to share the printer with a Windows device
- None address the fact that trying to an offline IPP printer causes the printing interface to freeze for a significant amount of time
- Few discuss the issue of Foomatic taking forever when loading the driver list, especially so on the Raspberry Pi
- Some suggest to use SAMBA (SMB) to share the printer
- SAMBA is… not the nicest to setup, and it tends to significantly slow down the boot process.
- Again, trying to print to an offline SMB shared printer will quite often lock up the print dialogue.
- Fewer still suggest to use LPRng
- This is actually a very good and simple way to share the printer to a Windows computer. For a guide on this, see here. The only reason I stuck with CUPS in the end was because of better support for non-Windows clients.
Setting up the Raspberry Pi
Base install
To ensure the fastest boot time, I wanted to use the slimmest (as reasonable) possible operating system. My go-to solution for this is the raspbian-ua-netinst project, which allows you to make a minimal Raspbian installation. The steps are fairly simple:
- Download the latest image from here and write it to your microSD card. For example, download and unzip raspbian-ua-netinst-v1.0.9.img.xz, then use something like Win32DiskImager to write
raspbian-ua-netinst-v1.0.9.imgto your microSD card. -
The microSD card should now show up as a FAT drive on your computer - this is the boot partition. For some added customisation, add a new file called
installer_config.txt. This allows you to customise the installation as documented here. This is the contents of the configuration that I used:1 2 3 4 5 6 7
preset=server packages=nano,sudo,apt-utils,bash-completion mirror=http://mirror.internode.on.net/pub/raspbian/raspbian/ release=jessie hostname=pi rootpw=admin bootsize=+64M
This allows for some extra packages to be installed by default. It also allows me to set the download mirror to use, as well as to shrink the size of the boot partition down to 64MB.
- From here, you can simply put the card back in your RPi, plug the Ethernet jack into your router and power it up. It will automatically connect to the internet and download the latest files to make your minimal distribution. I find it takes around an hour for an RPi B+. When it’s done, you will be able to SSH into it.
Customisation
Given that the installation is minimal, there are less conveniences provided out of the box. These steps make it a bit nicer to use:
- SSH to the device as
root. If configured as above, the password isadmin. Otherwise, the default israspbian. -
Add a non-root user:
1
adduser pi
Follow the prompts to set up the user details and password.
-
Add the user to the sudoers list:
1
visudo
Add the following line:
1
pi  ALL=NOPASSWD: ALL
You can now login as that user (
piin this case) instead of root. -
Reconfigure the time zone:
1
dpkg-reconfigure tzdata
-
To save space, I did not generate any locales. But if you wish to:
1
dpkg-reconfigure locales
- To further save space, I disable the installation of man files, as per this guide
Setting up the print server
At this point, we will be installing a minimal CUPS server installation.
-
Install CUPS:
1
apt-get install --no-install-recommends cups
This installs CUPS while not installing any of the drivers and SANE (scanner interfacing). I found that this was better than letting it install all the drivers, because it seems to install Foomatic. Foomatic takes forever to enumerate its driver list, which often causes CUPS to time-out at the driver selection page.
-
Install the drivers for your printer. OpenPrinting is a great resource for this. For the HL-2140, it uses the HPIJS driver:
1
apt-get install printer-driver-hpijs -
Add your user to the CUPS admin group:
1
usermod -a -G lpadmin pi
-
Modify CUPS to allow for remote administration. Modify
/etc/cups/cupsd.conf:1
Listen 0.0.0.0:631Find the following sections and add
Allow @LOCALto them:1 2 3 4 5 6 7 8 9 10 11
# Restrict access to the server... <Location /> Order allow,deny Allow @LOCAL </Location> # Restrict access to the admin pages... <Location /admin> Order allow,deny Allow @LOCAL </Location>
To disable print jobs from being stored, add:
1
PreserveJobFiles No
Restart CUPS:
1
systemctl restart cups
-
Browse to
http://your-pi-ip:631, then go toAdministration -> Add Printer. If asked to, click on the link to upgrade to admin control - use your username and password for the account you created with thelpadmingroup.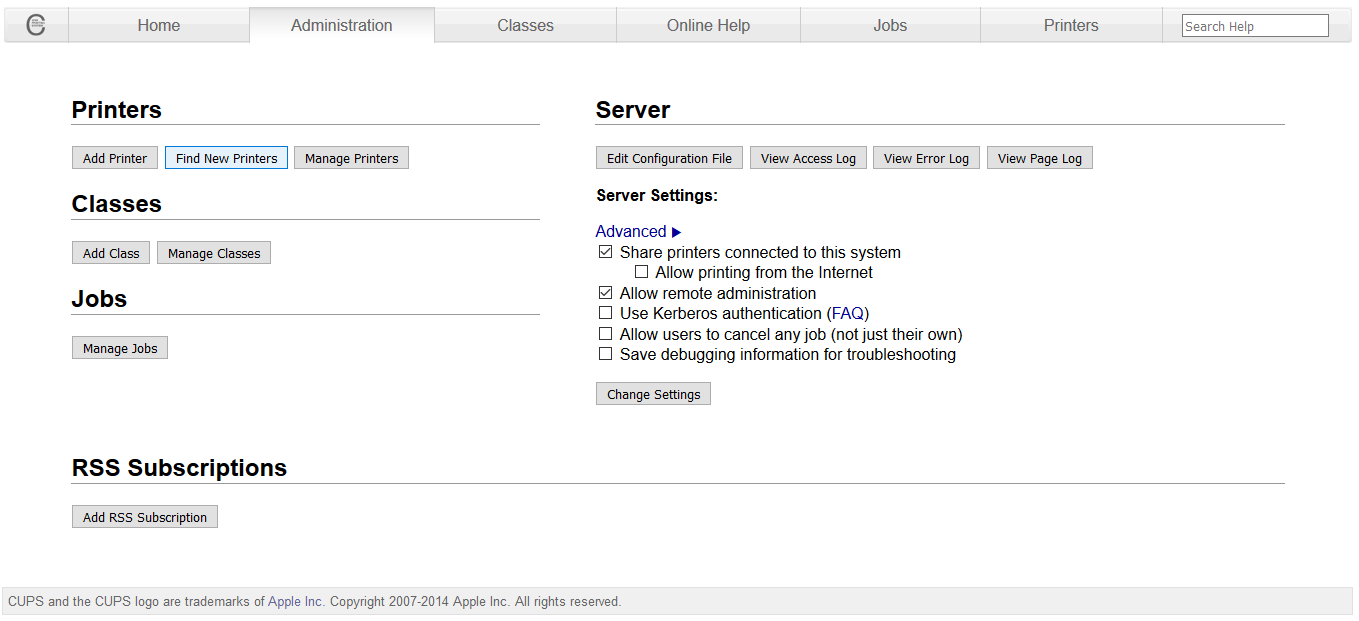
-
From the
Add Printerpage, select the printer that you wish to add.
-
In the next page, select a name for the printer - this will be the name of this printer’s queue, so I recommend choosing a simple name, like
hl2140. Ensure the ‘Share This Printer’ option is checked.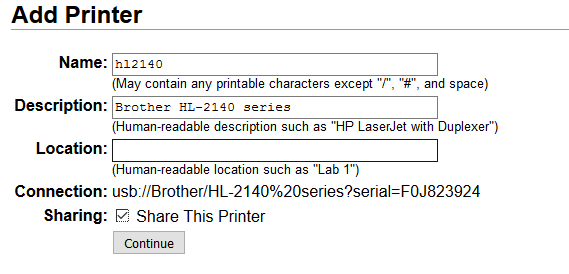
-
On the next page, you must provide a PPD file for your printer. Since we chose a minimal install, the list of pre-provided drivers is small. For example, here is the link to the OpenPrinting page for the HL-2140. On that site, click on
directly download PPD. On the CUPS page, click onBrowseand select the downloaded PPD file. ClickAdd Printerto complete the process. Note that the PPD file is separate to the printer driver (such asprinter-driver-hpijs).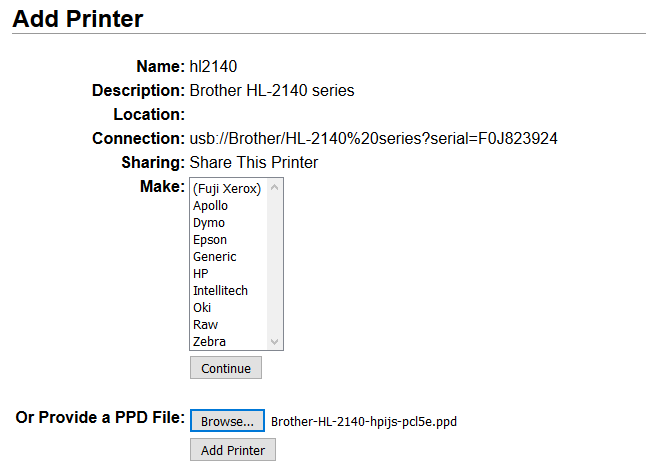
-
To enable LPR support for Windows, we need to install the inet daemon:
1
apt-get install openbsd-inetd
Once installed, add the following line to the end of
/etc/inetd.conf:1
printer stream tcp nowait lp /usr/lib/cups/daemon/cups-lpd cups-lpd -o document-format=application/octet-stream
Restart inetd with:
1
systemctl restart openbsd-inetd
-
For AirPrint support, you must install
avahi-daemon:1
apt-get install --no-install-recommends avahi-daemon libnss-mdns
Testing the setup
At this point, the RPi is mostly configured. Try adding and using the printer from your devices:
Testing on Windows
- Go to
Devices and Printers(found in the Control Panel or via a search from the Start Menu) - Click on
Add a printerthen onThe printer that I want isn't listed - Select
Add a printer using a TCP/IP address or hostnameand click OK - Enter the IP address of your RPi (assign it a static one). Uncheck the
Query the printer and automatically select the driver to useoption and click Next. This will take a while. - In the
Additional port information requireddialogue, selectCustom, then click onSettings.... - Set the protocol as
LPR. Set the queue name to the name that you called the printer in CUPS. In this case,hl2140. -
Check the option labelled
LPR Byte Counting Enabled. LeaveSNMP Status Enabledunchecked. Click Next.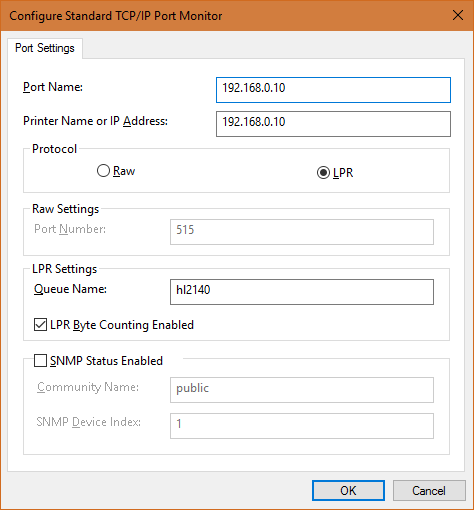
- Either select the appropriate driver from the list, or click on
Have Diskand point it to the driver to use. IMPORTANT FOR HL-2140 - it is actually better to use the HL-2150N driver instead of the HL-2140 driver. This is because the HL-2150N driver allows you to print while offline, unlike the HL-2140 driver, which just discards the document. - Follow the remaining prompts and print a test page.
Testing on Android
- For Android, I’ve found Let’s Print Droid to work.
- When adding the printer, use IPP instead of LPR - this allows the documents to be rendered on the RPi. If instead you use LPR, you must then install Let’s Print PDF which renders the document on your device before sending to the printer. To use IPP, set the address as
http://your-pi-ip:631/printers/printer-name(e.g.http://192.168.0.10:631/printers/hl2140)
Testing on iOS
- Tap on the share button and select
Print. - Search for AirPrint devices - the shared printer should be listed.
Further customisations to the RPi
Enabling the watchdog
As an embedded system, it’s a good idea to enable the watchdog, which will restart the system if for example the RPi crashes or locks up.
-
Modify
/boot/config.txtto enable the watchdog:1 2
# Add this line to the end of config.txt dtparam=watchdog=on
On next reboot, the watchdog should be enabled and the
bcm2835-wdtmodule should be active. -
Install the watchdog client:
1
apt-get install watchdog
This client allows you to specify more options for when the watchdog should trigger a restart. This works in tandem with the
wd_keepaliveservice, which merely continues to feed the watchdog if no conditions are specified. See here for more information on configuring the watchdog.
Read-only file system
To make the RPi more resilient to frequent power interruptions, I wanted to make the file system read-only. This would also help to prevent unnecessary wear to the microSD card.
What I found to work was overlayroot, which makes changes to the file system temporary. When changes are made to the filesystem, they are stored in-memory. Changes are then lost on the next reboot.
To set this up, I suggest to follow the instructions provided in that repository. As a point of clarification, if you wish to make persistent modifications once this overlay system is in effect, simply run the rootwork script to get a shell where modifications will stick:
1
2
./rootwork
# Anything you do here will persist to disk
Modifications to the printer
WARNING: This section involves modifying the internals of your printer. In addition to potentially voiding your warranty, there is high voltage circuitry inside, which must be handled with utmost care. Attempt this section at your own risk.
As I wanted the RPi to start and stop with the printer being turned on and off, I wanted to tie its power supply in some way to the power switch on the printer. I could either do this on the mains side by inlining the RPi’s power supply to the switch, or I could simply tap off the 5V rail of the printer’s own power supply.
Given that I didn’t really want to touch the mains side electronics, I had to find a point at which it supplied 5V power. Luckily, it appears that this is possible by tapping off the printer’s mainboard.
Unfortunately, I also forgot to take photographs while doing this, but luckily it’s not too hard to find the service manual. The mainboard is on the left side of the printer, as shown below:
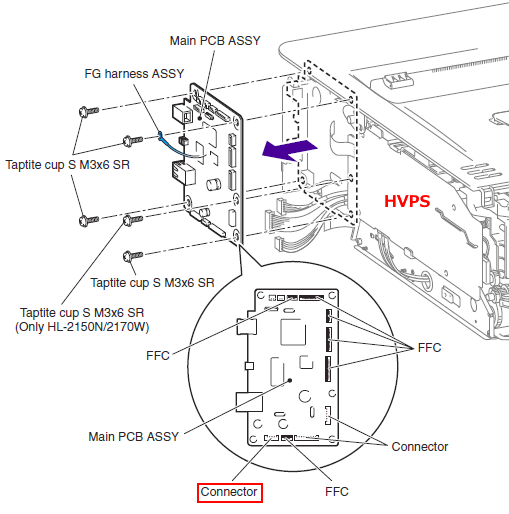
The connector highlighted in red is where I tapped off the 5V power supply. From the service manual, the +5V pin is the 2nd pin from the right, with GND being the 3rd pin from the right. It’s best to confirm this with a multimeter.
Also note the high-voltage power supply (HVPS) that I have highlighted in red. This is the power supply that steps up the mains voltage, presumably for use with the laser. You can identify it by the extensive anti-tracking slots and wide isolation gaps on the PCB. It goes without saying, but you really do not want to play with this circuit. You have been warned.
To connect this up to the RPi, I had a spare USB extension lead like this:
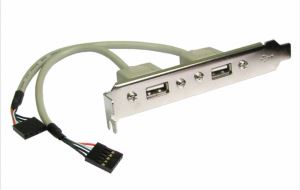
This was actually perfect, because I could fit one of those ports into the existing housing fairly easily. I just had to drill out the backplate that also held the existing USB port. With some care, you can drill the holes for the screw terminals, so that you can secure the port to the backplate. I then cut off the original connector and the data wires, leaving me with only the +5V and GND lines. I then just tinned those lines and stuffed them into the existing connector.
With everything back in place, this connects to the RPi via its microUSB port, while the existing USB-B port connects via the RPi’s normal USB ports.
Final notes
All in all, I think the modification went well. I was quite happy with how clean the physical modifications to the printer were, with my only concern being if the RPi would overload the printer’s internal power supply. In hindsight, it would have been better to measure the current draw of the RPi, but with everything fitted back together, I am reluctant to open it again. I guess time will tell how well it holds up!
Software-wise, it did take a few attempts and false-starts to get everything to where I was happy, but it does seem fairly robust. For what it’s worth, the idea of using LPR for Windows was based on what my old printer did. Sure, it’s an older and less ‘advanced’ protocol than IPP, but it works, and works well. One thing that doesn’t work is the printer status. I think this works through SNMP, but I don’t know how to properly configure this through CUPS.
Comments